Hatha Yoga, a time-honored practice, is deeply rooted in a holistic approach that emphasizes alignment, strength, balance, and flexibility. These poses not only enhance the physical body but also cultivate a sense of inner calm and balance. Here are 10 classic Hatha Yoga poses that epitomize the essence of this ancient tradition:
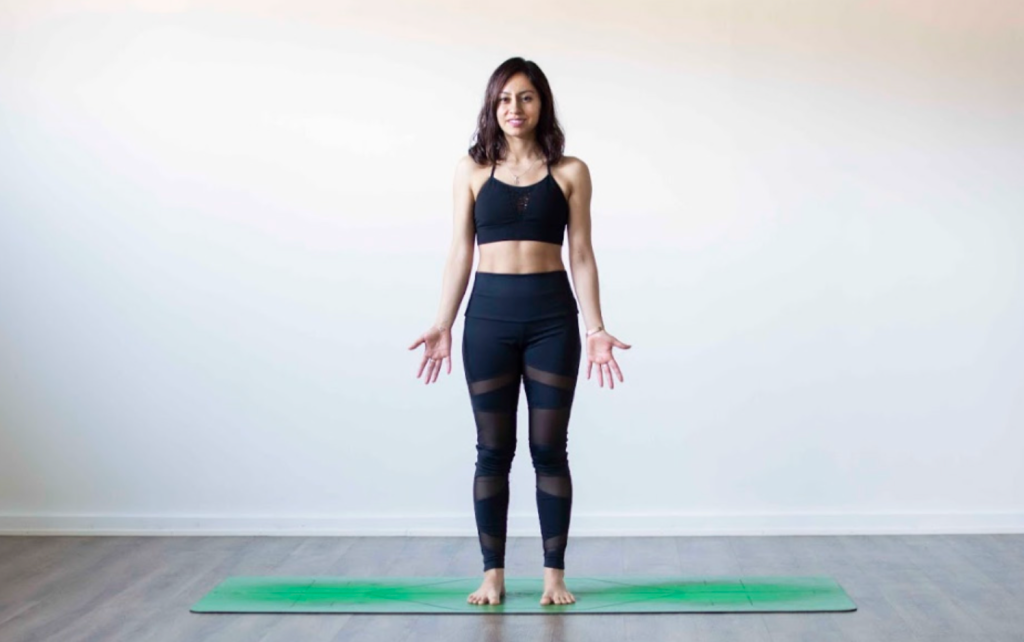
- Mountain Pose (Tadasana)
Focus: Posture, Balance
Level: Beginner
Total Time: 30 seconds to 1 minute
Indications: Improved posture, enhanced focus, foundation for other poses
Contraindications: Low blood pressure (ensure you come out of the pose slowly)
Description:
The Mountain Pose, or Tadasana, is a foundational pose in Hatha Yoga and serves as the starting point for many other asanas. It appears simple but teaches the art of grounding and stability. Regular practice helps in improving posture, strengthening thighs, knees, and ankles, and toning the abdominal muscles.
Instructions:
- Begin by standing tall with your feet hip-width apart. Ensure your weight is evenly distributed between both feet.
- Press your big toes into the ground and spread the rest of the toes apart. Feel the ground beneath you and imagine roots extending from your feet deep into the earth, grounding you.
- Engage your thigh muscles slightly, drawing up the kneecaps. Be careful not to harden your lower belly.
- Roll your shoulders back and down, away from your ears. Allow your arms to hang naturally by your sides with your palms facing forward.
- Elongate your neck, keeping it in line with your spine. Envision a string attached to the crown of your head, pulling you gently upwards.
- Breathe deeply and evenly. With each exhale, imagine any tension in your body releasing and melting away.
- Stay in the pose for 30 seconds to 1 minute, feeling the balance and stability in your body. Breathe deeply, focusing on the sensation of the breath entering and leaving your nostrils.
To release: Relax your breath, and step out of the position gently.
Remember, Tadasana is more than just standing; it’s about grounding yourself and finding your center. As with all yoga poses, ensure you’re in tune with your body, recognizing any discomfort and adjusting accordingly.
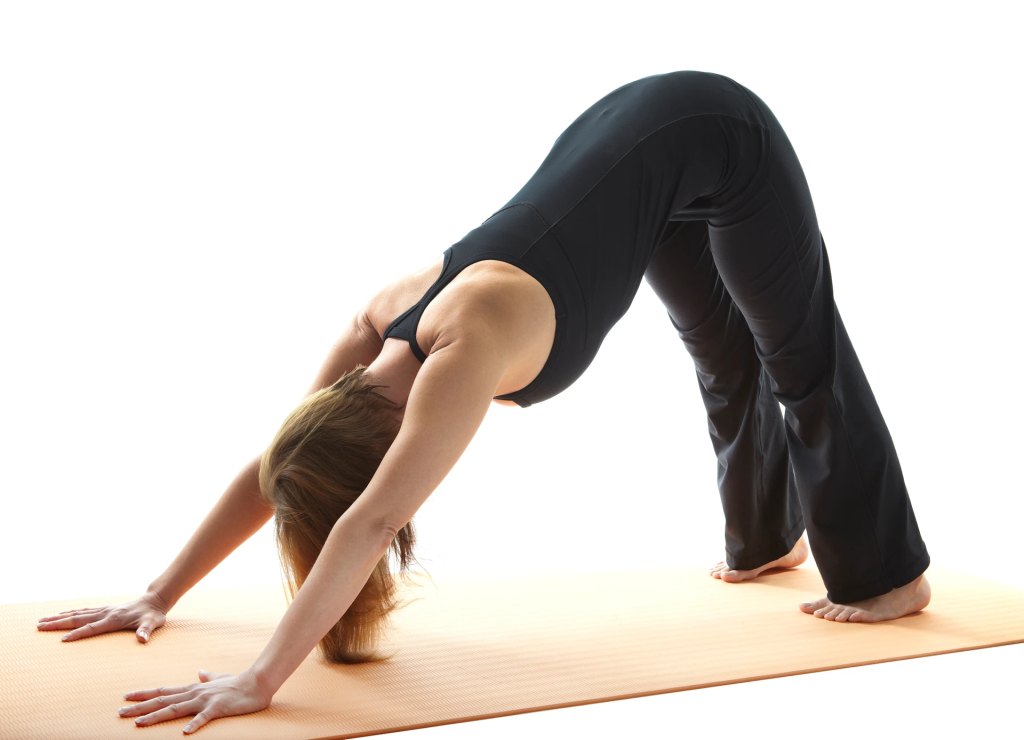
2.Downward-Facing Dog (Adho Mukha Svanasana)
Focus: Full Body Stretch
Level: Beginner to Intermediate
Total Time: 1 to 3 minutes
Indications: Improved circulation, energized body, strengthened arms and legs
Contraindications: Carpal tunnel syndrome, high blood pressure, late-term pregnancy
Description:
The Downward-Facing Dog, known as Adho Mukha Svanasana in Sanskrit, is one of the most iconic and widely recognized poses in Hatha Yoga. This inversion offers a full-body stretch, revitalizing the body, improving digestion, and calming the mind.
Instructions:
- Start on your hands and knees, positioning your wrists directly under your shoulders and your knees under your hips. Spread your fingers wide and press your palms firmly into the mat.
- Breathe out, tuck your toes, and slowly lift your knees off the ground. Begin by raising your pelvis towards the sky, working towards straightening your legs and bringing your body into an inverted ‘V’ shape.
- Push away from the ground with your hands, lengthening your spine. Draw your shoulder blades towards your lower back, allowing your head to hang neutrally between your arms.
- Keep your feet hip-width apart, with heels aiming for the ground. It’s okay if they don’t touch the mat; the intention is more important than achieving the full pose.
- Engage your thigh muscles, pulling them upwards, and try to rotate your inner thighs back.
- Breathe deeply, filling every corner of your body with fresh oxygen. With each exhale, try to deepen into the pose, pushing your chest gently towards your thighs.
- Hold the pose for 1 to 3 minutes. Allow any tension in the neck, shoulders, or back to melt away with each exhalation.
To release: Breathe in and gently bend your knees, returning to your hands and knees position. Rest in Child’s Pose for a few breaths to counteract the stretch.
The Downward-Facing Dog is not just a transition pose; it’s an opportunity to reconnect with your body, align your spine, and find tranquility amidst a rigorous routine. Practice regularly for optimal benefits and always ensure you’re listening to your body, making any needed adjustments.
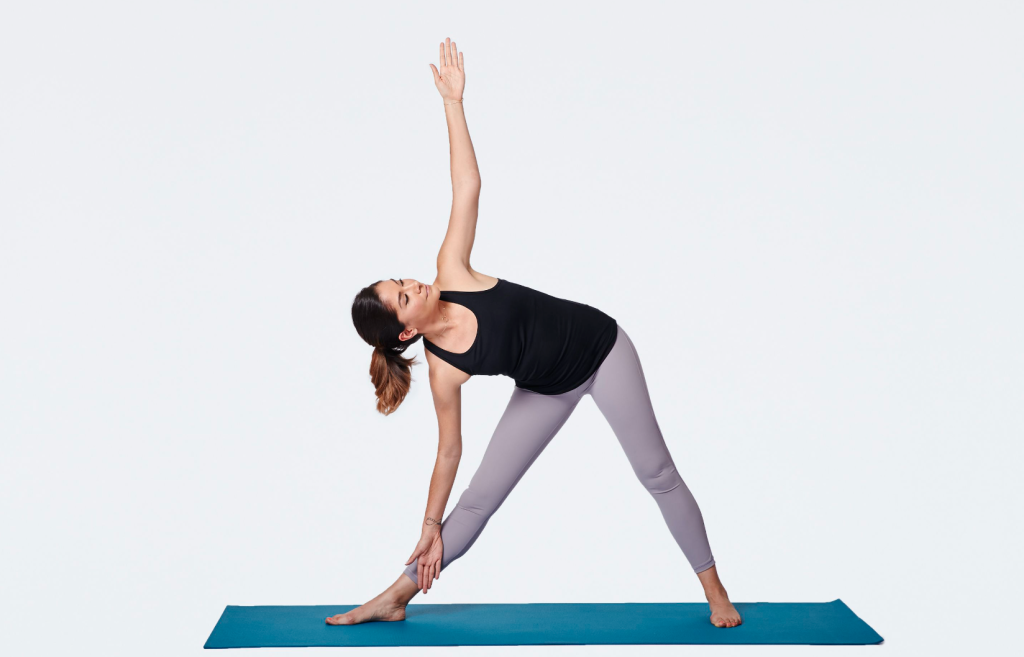
- Triangle Pose (Trikonasana)
Focus: Hips and Spine
Level: Intermediate
Total Time: 30 to 60 seconds on each side
Indications: Improved digestion, relief from backaches, stress reduction, enhanced flexibility
Contraindications: Neck injury, low blood pressure, migraine
Description:
The Triangle Pose, known in Sanskrit as Trikonasana, is a foundational Hatha Yoga posture that embodies the strength and stability of a triangle. It elongates the spine, opens the chest and shoulders, and offers a deep stretch to the legs.
Instructions:
- Begin by standing in the Mountain Pose with your feet together. Step your feet apart, roughly the length of one leg.
- Extend your arms parallel to the ground, palms facing downwards, reaching actively from fingertip to fingertip.
- Turn your right foot out 90 degrees, so your toes are pointing to the top of the mat, and pivot your left foot slightly inwards. Align your right heel with the center of your left foot.
- Inhale deeply. As you exhale, extend your upper body over your right leg. Keep your waist straight, bending to the side, not forward. Let your right hand drop towards your shin, ankle, or the ground (whichever is comfortable without straining), while your left arm reaches up towards the sky.
- Turn your gaze upwards to your left hand, keeping your neck aligned. If you have neck issues, keep your gaze downwards or forward.
- Your body should be in a straight line, with your chest and hips open, not facing the ground.
- Engage your thigh muscles and press actively through the feet, grounding into the mat.
- Hold this pose for 30 to 60 seconds, breathing deeply and evenly.
To release: Inhale and press down through the feet, lifting the torso upright. Pivot on the heels to turn the feet forward and bring your arms down to your side. Repeat on the left side.
The Triangle Pose is a celebration of stability, balance, and openness. With regular practice, you can enhance your flexibility, strengthen your legs, and bring a sense of tranquility to your mind. As with all poses, it’s essential to honor your body’s boundaries and make modifications as necessary.
- Tree Pose (Vrksasana)

Focus: Balance and Stability
Level: Beginner to Intermediate
Total Time: 30 to 60 seconds on each leg
Indications: Improved balance, strengthened thighs, calves, ankles, and spine, relief from sciatica, improved posture and concentration
Contraindications: High or low blood pressure (should not keep arms overhead), insomnia
Description:
The Tree Pose, or Vrksasana in Sanskrit, embodies the serene grace of a tree. While it might appear simple, it is a pose that tests and improves balance, stability, and focus, all while grounding the practitioner through the foot and reaching up through the crown of the head.
Instructions:
- Start by standing tall and straight in Mountain Pose with your arms at your sides.
- Shift your weight onto your left foot. Bend your right knee, then using your right hand, grasp your right ankle.
- Place the sole of your right foot on the inside of your left thigh, as high up as it will go. If this is too challenging, you can place it on the inside of your left calf, but never on the knee joint.
- Once you feel balanced, bring your hands to a prayer position at your heart. Ensure your pelvis is neutral and your left leg is straight.
- Take a deep inhale. As you exhale, extend your arms overhead, keeping them shoulder-width apart or maintaining the prayer position.
- Fix your gaze on a still object in front of you, helping you maintain balance.
- Stay here, breathing deeply and evenly. Feel the groundedness through your left foot and the lift through your arms and crown of the head.
- Hold for 30 to 60 seconds, then gently release your right leg and lower your arms.
To release: Slowly bring your hands back to your heart center, release your right leg, and stand in Mountain Pose. Repeat on the opposite side.
Embracing the essence of a tree, Vrksasana strengthens and balances the body while cultivating patience, concentration, and poise. As your practice evolves, you might find a deeper sense of connection between the earth below and the sky above, just as a tree does.
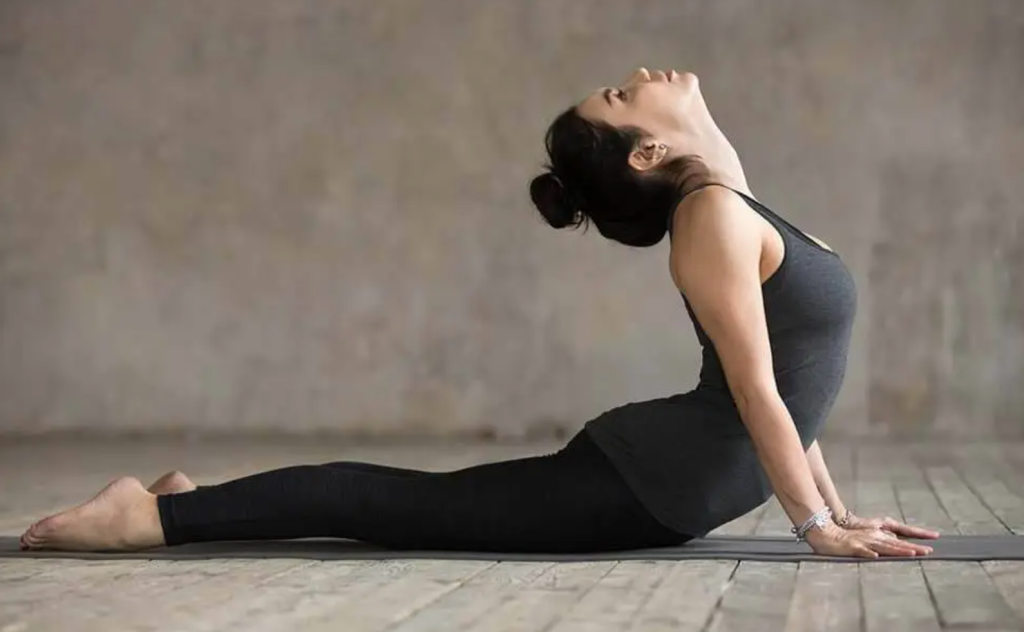
- Cobra Pose (Bhujangasana)
Focus: Back and Abdominal Strength
Level: Beginner
Total Time: 15 to 30 seconds
Indications: Strengthening the spine, stretching chest and lungs, shoulders, and abdomen, relieving stress and fatigue, soothing sciatica, increasing lung volume and helping with asthma
Contraindications: Pregnancy, hernia, lower back injury
Description:
The Cobra Pose, known as Bhujangasana in Sanskrit, is reminiscent of a serpent raising its hood. The pose instills strength and invigoration, stretching the front body and engaging the back muscles. It is an integral part of the sun salutations practiced in many forms of yoga.
Instructions:
- Begin by lying face down on your mat, with your legs extended behind you. The tops of your feet should rest on the mat, toes pointing backward.
- Position your hands under your shoulders with your palms facing down. Keep your elbows tucked into your sides.
- Press the tops of your feet, your thighs, and your pubis into the mat.
- As you inhale, begin to lift your chest off the floor by straightening your arms. Engage your back muscles, imagining them as the driving force of the movement.
- Keep your chin neutral, with your gaze directed to the floor in front of you, or slightly forward.
- Ensure your shoulders remain down and back, away from your ears, and press your shoulder blades towards each other.
- Only go as high as is comfortable, keeping your pubis, legs, and feet pressing into the floor. Do not lock your elbows; maintain a slight bend.
- Breathe deeply, opening your chest and drawing your heart forward.
- Hold for 15 to 30 seconds, feeling the gentle curve and stretch of the spine.
To release: On an exhale, gently lower your chest back to the mat, resting your forehead on the floor. Relax and then press back into a Child’s Pose for a few breaths to counter-stretch.
By emulating the poise and power of a cobra, Bhujangasana helps to rejuvenate the spine, stimulate abdominal organs, and set the practitioner’s spirit soaring. With each rise into the pose, one is reminded of the beauty of rejuvenation and the strength within.
- Child’s Pose (Balasana)
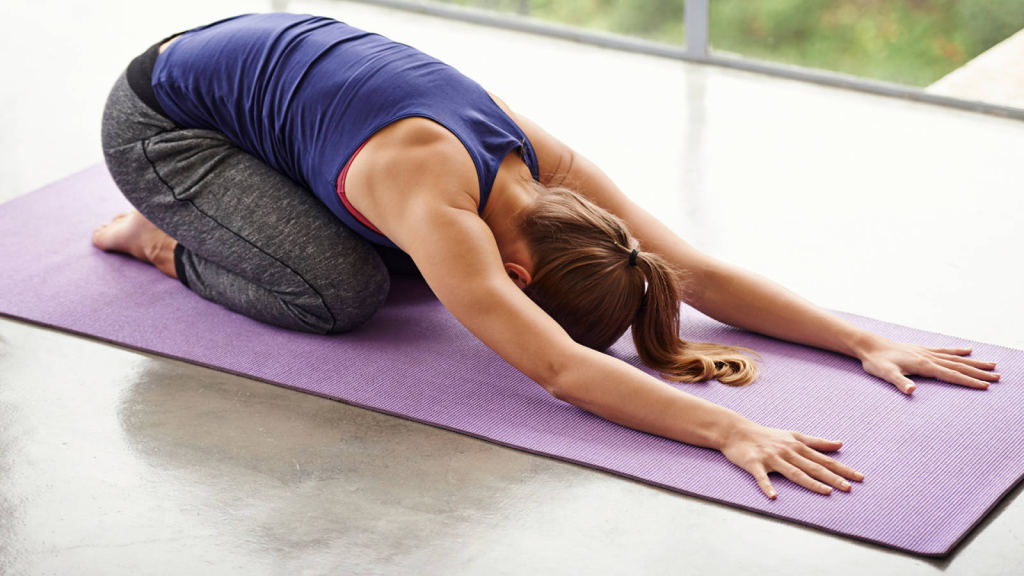
Focus: Relaxation and Spinal Stretch
Level: Beginner
Total Time: 1 to 3 minutes
Indications: Relieves fatigue, calms the brain, gently stretches the hips, thighs, and ankles, reduces stress and anxiety
Contraindications: Pregnancy, knee injuries, diarrhea
Description:
The Child’s Pose, or Balasana in Sanskrit, embodies the innocence and serenity of a resting child. It’s a pose of surrender and relaxation, often used as a resting posture in between more challenging poses during a yoga practice. By turning inward and grounding oneself, Balasana helps in reconnecting with the earth and finding a moment of peace amidst the practice’s intensity.
Instructions:
- Begin by sitting on your heels with your knees hip-width apart. Your big toes should touch each other behind you.
- Inhale deeply and as you exhale, lean your torso forward, extending your arms in front of you on the mat.
- Let your forehead gently rest on the ground. If needed, you can place a yoga block or folded blanket beneath your forehead for comfort.
- Extend your arms forward to lengthen the spine, but allow them to relax. Your chest should move closer to your thighs.
- Relax your shoulders, letting them drop towards the ground. This releases any tension from the shoulder blades down through the spine.
- Take deep, steady breaths. With each exhale, allow your body to relax further into the pose, sinking deeper into the stretch and the ground beneath you.
- Hold the pose for 1 to 3 minutes or as long as it feels comfortable.
To release: On an inhalation, gently lift your torso and sit back on your heels, bringing your hands to rest on your thighs.
Child’s Pose, Balasana, is a gentle retreat into oneself, offering a respite and rejuvenation amidst life’s busyness. It serves as a humble reminder to pause, reflect, and nurture the inner child within each of us.
- Seated Forward Bend (Paschimottanasana)
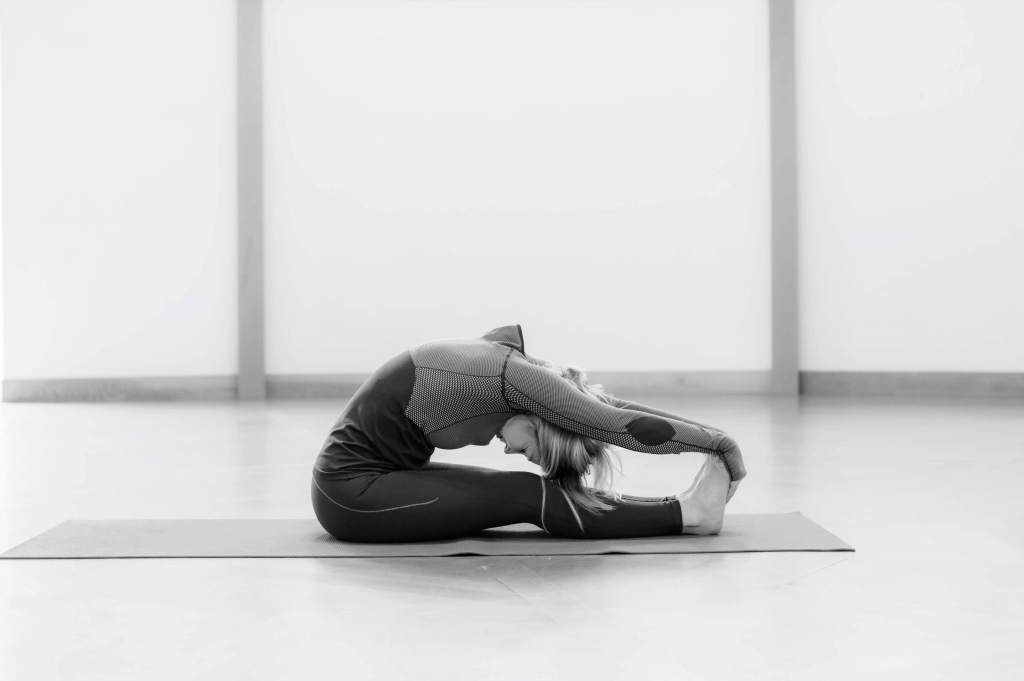
Focus: Spine and Hamstrings
Level: Intermediate
Total Time: 1 to 3 minutes
Indications: Calms the brain, relieves stress and mild depression, stretches the spine, shoulders, and hamstrings, aids digestion, reduces anxiety and fatigue
Contraindications: Back injuries, asthma, diarrhea
Description:
Paschimottanasana, often translated as the Seated Forward Bend, beckons practitioners to fold into themselves, facilitating a journey of introspection and calm. Beyond its physical benefits, the pose is renowned for its ability to calm the mind and spirit, symbolizing the surrender of ego and the union of body and soul.
Instructions:
- Begin seated with your legs stretched out in front of you, feet flexed. Make sure you’re grounded through your sit bones, and if needed, sit on a folded blanket to elevate the hips.
- Inhale deeply, elongating the spine, lifting the chest and drawing the shoulders back.
- Exhale, and hinge at the hips to lean your torso forward towards your legs. Try to keep the spine elongated, rather than rounding it.
- As you deepen into the pose, you may choose to grasp the sides of your feet, ankles, or shins, whatever is accessible.
- Allow your gaze to softly focus on the toes or let the eyes close completely, deepening the inward focus.
- With each exhalation, surrender deeper into the pose, inviting the chest closer to the knees and the forehead towards the shins. Remember to maintain the length in the spine, rather than forcing the bend.
- Stay in the pose for 1 to 3 minutes, taking deep and calming breaths.
To release: Inhale and lift the torso up, returning to the seated position with legs extended. Release the hands and let them rest alongside the body.
The Seated Forward Bend, or Paschimottanasana, teaches humility, patience, and surrender. Embracing the quiet stillness within this pose, one can find both physical relief and a deeper connection with the self.
- Bridge Pose (Setu Bandha Sarvangasana)
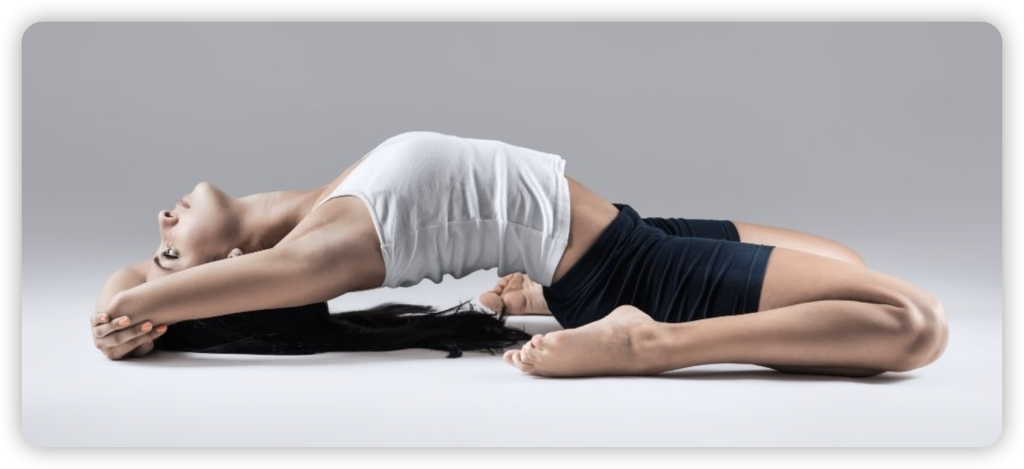
Focus: Spine and Chest
Level: Beginner
Total Time: 30 seconds to 1 minute
Indications: Stretches the chest, neck, and spine, calms the brain, alleviates stress and mild depression, stimulates abdominal organs, lungs, and thyroid, reduces anxiety, fatigue, backaches, headaches, and insomnia
Contraindications: Neck injury unless supervised by an experienced teacher
Description:
The Bridge Pose, reminiscent of a bridge that spans the rivers, connects the body and mind while opening up the heart. This rejuvenating backbend pose can be both energizing and restorative, building strength and flexibility in equal measure.
Instructions:
- Start by lying on your back with knees bent and feet flat on the floor. Place your feet hip-distance apart and bring your heels close to the buttocks.
- Arms should rest alongside your body with the palms facing down.
- Inhale deeply, pressing your feet and palms into the floor, and lift your hips towards the ceiling. Ensure your feet remain parallel.
- Roll the shoulders underneath you and consider clasping your hands underneath your elevated hips. This will allow you to lift your hips even higher.
- Keep your thighs and feet parallel as you press into the heels. Let your chest rise towards the chin, but keep the chin slightly away from the chest, ensuring a space in the cervical spine.
- Breathe deeply, lifting the hips higher with each inhalation. Feel the stretch across the chest and spine while engaging the glutes and hamstrings.
- Maintain the pose for 30 seconds to 1 minute.
To release: Unclasp your hands if they were joined, and on an exhalation, slowly roll the spine back down to the floor, vertebra by vertebra, letting the hips come down last.
Setu Bandha Sarvangasana, or the Bridge Pose, acts as a bridge between the physical and subtle body, creating a space of openness and serenity. Its rejuvenating energy serves as a foundation for other poses and offers a moment of reflection and connection.
- Warrior II (Virabhadrasana II)
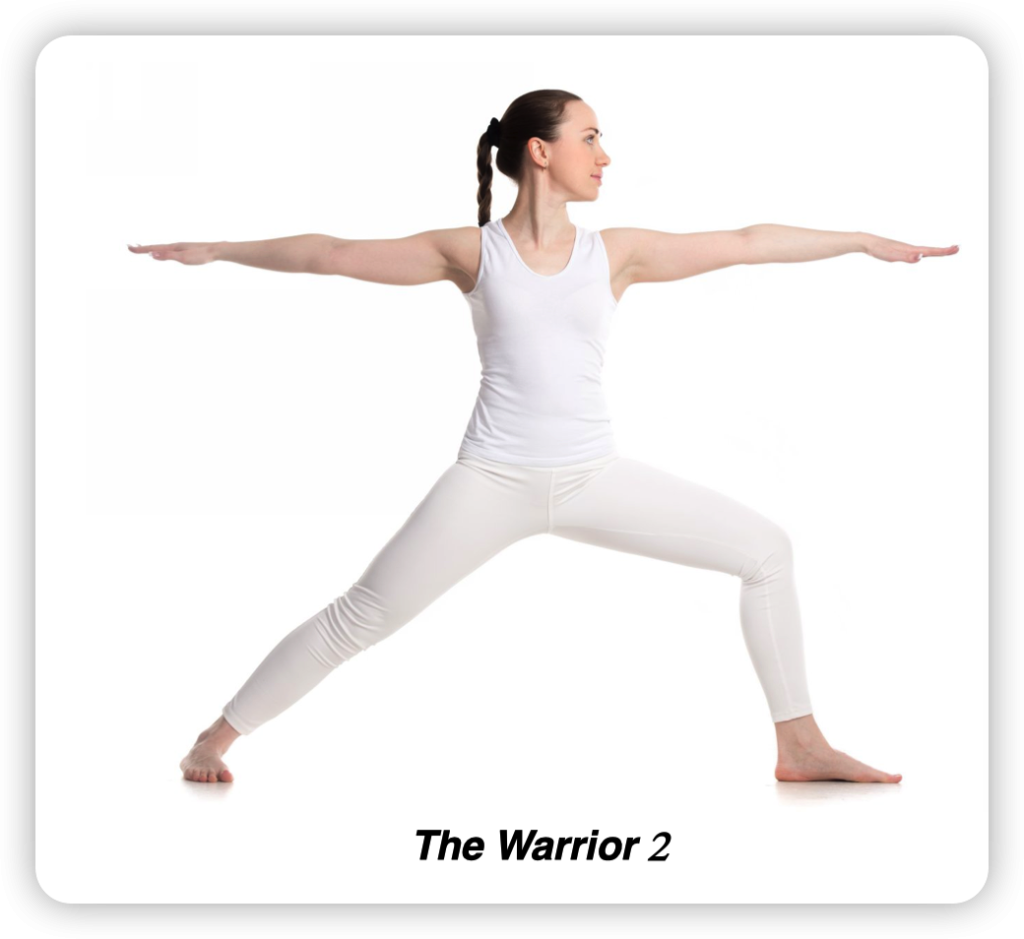
Focus: Legs and Hips
Level: Beginner
Total Time: 30 seconds to 1 minute per side
Indications: Strengthens and stretches the legs and ankles, stretches the groin, chest, lungs, and shoulders, increases stamina and endurance, relieves backaches, especially during pregnancy
Contraindications: Diarrhea, neck problems
Description:
Embodying the strength and focus of a determined warrior, Warrior II is a symbol of inner resilience and power. This iconic pose not only enhances physical strength but also instills a sense of mental and emotional determination.
Instructions:
- Begin by standing in Mountain Pose (Tadasana). Take a deep breath and, as you exhale, step or jump your feet 3-4 feet apart.
- Turn your right foot out 90 degrees, aligning your right heel with the arch of your left foot. Your left foot should be turned in slightly, about 45 degrees.
- On an inhalation, raise your arms parallel to the floor, reaching out to both sides with palms facing down. Your arms should be aligned directly over your legs.
- As you exhale, bend your right knee over the right ankle so the shin is perpendicular to the floor. Aim to get the right thigh parallel to the ground.
- Turn your head to gaze out over your right fingertips, ensuring your shoulders remain stacked above your hips without leaning forward or backward.
- Press the outer edge of your left foot firmly into the ground and lengthen the tailbone towards the floor.
- Relax your shoulders, drawing them away from your ears. Keep your face, neck, and shoulders relaxed, but maintain the strong and fierce energy in your legs and arms.
- Remain in this pose for 30 seconds to 1 minute. Breathe deeply, feeling the strength of a warrior coursing through your body.
To release: On an inhalation, straighten your right leg, and drop your arms to your side. Turn your feet forward and repeat the pose on the other side.
Warrior II cultivates balance, poise, and groundedness, reminding practitioners to stand firm in their convictions while maintaining openness and grace. It’s a celebration of the strength and courage within, pushing boundaries and challenging limitations.
- Corpse Pose (Savasana)
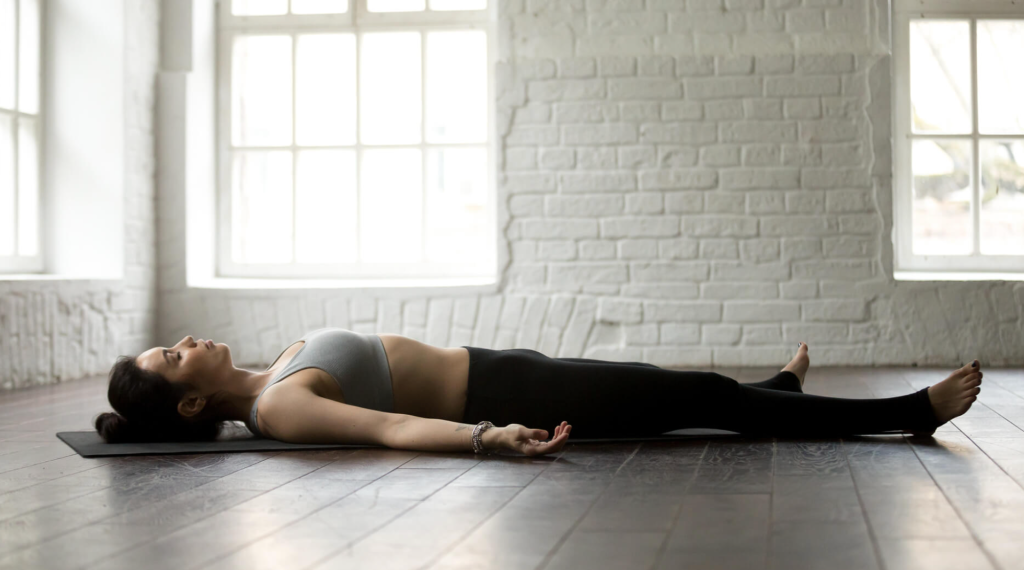
Focus: Whole Body Relaxation
Level: Beginner
Total Time: 5 to 15 minutes
Indications: Enhances relaxation, relieves stress, soothes the nervous system, rejuvenates mind and body, prepares the body for deeper meditation
Contraindications: Back discomfort; for those with lower back issues, it might be helpful to place a bolster or folded blanket under the knees to support the lumbar spine.
Description:
A pose that appears deceptively simple, the Corpse Pose is the embodiment of stillness and calm. As one of the most significant postures in yoga, it promotes profound relaxation and inner peace, providing the opportunity to delve deep within.
Instructions:
- Lie flat on your back on a comfortable surface, ensuring that you are completely straight. Allow a little space between your feet, letting them fall naturally to the sides.
- Place your arms alongside your body, but slightly apart. Your palms should face upwards, in a gesture of receiving.
- Gently close your eyes, drawing your attention inwards.
- Let go of any control over your breath. Just breathe naturally, letting the breath flow in and out of the nostrils.
- Progressively scan each part of your body, starting from your toes and moving upwards. As you bring awareness to each body part, consciously relax and release tension from it.
- Let go of any active thoughts, disturbances, or tensions. Dive into a state of deep relaxation and peace. While the body remains motionless, allow your consciousness to float freely.
- Stay in this pose for at least 5 minutes, allowing the benefits to seep in. The longer you can maintain Savasana, the more rejuvenated you will feel.
To release: Begin by slowly deepening your breath. Gently move your fingers and toes, awakening the body. Stretch your arms overhead, lengthening the body. Roll over to one side and lie there for a few moments. Using your hands, press yourself into a sitting position.
Savasana is a practice of deliberate stillness, asking one to find calm in the midst of silence. In this state of profound relaxation, one can find clarity, rejuvenation, and a deepened sense of awareness. It’s not just the conclusion of a yoga session but a bridge to a more harmonized state of being.
These fundamental poses serve as the bedrock of Hatha Yoga, offering a harmonious blend of physical exertion and mental tranquility. As you immerse yourself in each posture, remember to breathe with intention, maintain alignment, and honor your body’s boundaries. If you’re just embarking on your yoga journey, seeking guidance from a certified instructor can pave the way for a safe and enriching experience. Embrace the journey, and let these poses guide you to a deeper sense of self and well-being.